Immunodetection Protocol Using the Immobilon® GO Device
Immobilon® GO is a hands-free, immunodetection device designed for mini Western blot processing. Our unique design uses continuous, sequential fluid convection across a flow matrix to enable autonomous antibody binding and membrane wash steps during immunodetection. Immobilon® GO is intended for one-time use and does not require an external power or vacuum source for operation. Standard non-fat dry milk TBST buffer is used to allow for easy transition from traditional Western blot protocols. Western blots can be processed in as little as 3 hours or may remain in the device overnight for processing.
General guidelines for Immobilon® GO immunodetection device
- Membrane should not be larger than 8.5 cm x 8 cm.
- Immobilon® GO device requires a flat level surface for proper operation.
- Avoid indenting membrane when labeling.
- Once reagents have been loaded, do not move or open Immobilon® GO device until immunodetection is completed (3 hours).
Order Immobilon® GO immunodetection device
Immobilon® GO device components
The Immobilon® GO immunodetection device contains two parts: the base assembly with flow matrix (Figure 1) and the device lid (Figure 2).

Figure 1.Components of Immobilon® GO device base assembly

Figure 2.Components of Immobilon® GO device lid
Materials required for immunodetection, but not supplied:
- Non-fat dry milk (NFDM)
- Tris-buffered saline with Tween® 20 (TBS-T) (20 mM Tris-HCl, pH 7.4, 150 mM NaCl, 0.1% Tween® 20)
- Blot Roller
- Forceps
- Incubation Tray
- Primary and secondary antibodies
How to use Immobilon® GO immunodetection device
Prepare reagents and membrane
- Prepare 25 mL of 2% non-fat dry milk (NFDM) blot buffer by completely dissolving 0.5 g of NFDM in 25 mL TBS-T.
- If blotting membrane was previously dried, wet in deionized water when using nitrocellulose or with methanol when using PVDF, washing thoroughly with deionized water to remove residual alcohol.
- Place wet membrane (protein side facing up) into a dish (Figure 3). Add 10 mL of 2% NFDM blot buffer on top of the membrane. Incubate for 5-10 minutes.
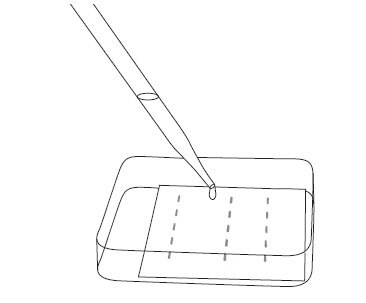
Figure 3.Block membrane by incubating in 2% non-fat dry milk blot buffer
4. Prepare primary and secondary antibody dilution in 2% NFDM blot buffer. A total volume of 1 mL is required for each antibody.
Position blocked membrane in Immobilon® GO device
5. Open Immobilon® GO device and fold back both parts of the flow matrix (Figure 4).
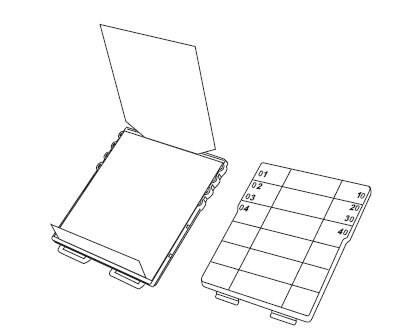
Figure 4.Remove lid and open both pieces of the flow matrix
6. Position blotting membrane (protein side up), 1 cm from stage edge. Low molecular weight proteins should be facing the notched flow matrix (Figure 5).
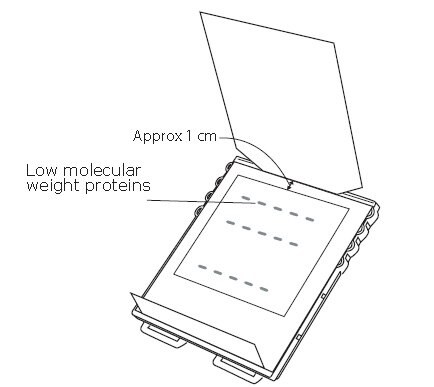
Figure 5.Place blocked membrane 1 cm from the stage edge with low molecular weight proteins towards the loading port
Add buffer for flow matrix
7. Fold flow matrix over the membrane and add 4 mL of 2% NFDM blot buffer evenly across the flow matrix (Figure 6).
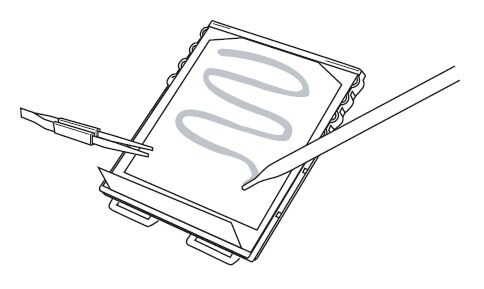
Figure 6.Fold top portion of flow matrix over the membrane and add NFDM blocking buffer
8. To assure even contact between the membrane and flow matrix, pull the blot roller from the loading port end toward the flow matrix tab (Figure 7).
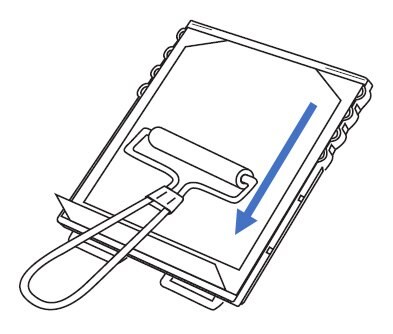
Figure 7.Use blot roller to assure even contact between the membrane and flow matrix
9. Using the blot roller fold over the flow matrix tab. Assure all air bubbles have been removed and close contact between the flow matrix and membrane has been established (Figure 8).
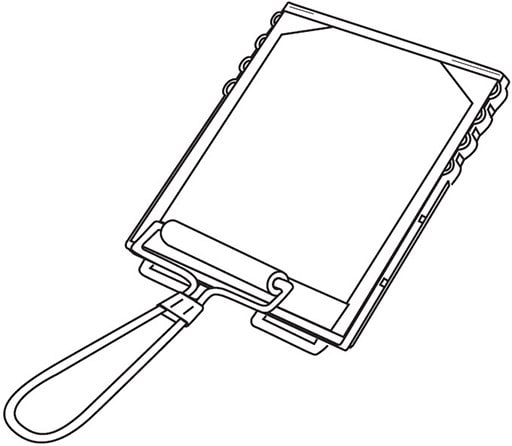
Figure 8.Seal flow matrix by folding over flow matrix tab with the blot roller.
Assemble Immobilon® GO device
10. Replace the lid (Figure 9).
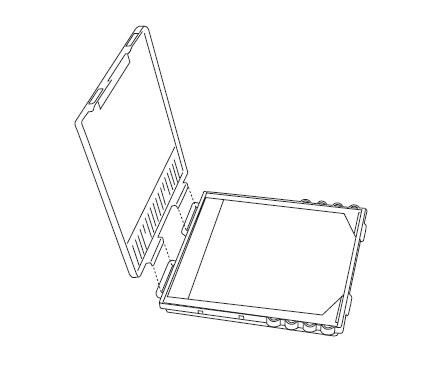
Figure 9.Replace lid on Immobilon® GO device
11. Seal lid by gently push down in area specified by loading ports; a clicking sound indicates that lid is closed (Figure 10).
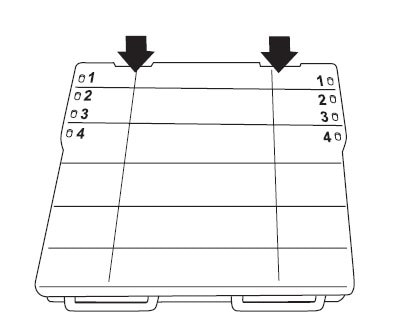
Figure 10.Seal lid by gently pressing down in designated areas until a clicking sound is heard
Add antibodies to activate Immobilon® GO immunodetection device
12. To activate Immobilon® GO device, add 2% NFDM blot buffer to the reagent loading ports in the order and volumes shown below (i.e., fill port 1A, followed by 1B) (Figure 11).
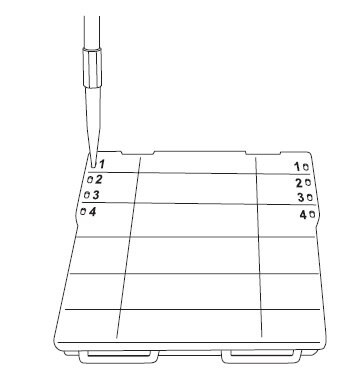
Figure 11.Addition of buffer and antibodies to loading ports
13. Add the primary and secondary antibodies in the order and volumes as outlined in the table below.
Incubate membrane in Immobilon® GO immunodetection device
- Incubate Immobilon® GO device for a minimum of 3 hours at room temperature.
- Remove blot from Immobilon® GO device and wash twice for 5 minutes with 50 mL TBS-T.
- Continue with desired detection method, as descibed in traditional Western blotting protocols.
For first time use of the Immobilon® GO immunodetection device, please refer to the detailed user guide.
Disclaimer:
We provide information and advice to our customers on application technologies and regulatory matters to the best of our knowledge and ability, but without obligation or liability. Existing laws and regulations are to be observed in all cases by our customers. This also applies in respect to any rights of third parties. Our information and advice do not relieve our customers of their own responsibility for checking the suitability of our products for the envisaged purpose.
Technical Assistance
For additional technical assistance, please visit our technical service page or contact us.
To continue reading please sign in or create an account.
Don't Have An Account?